Integration
This unit integrates math with language arts and arts education. Throughout the activities in this unit, the students are asked to respond to the concept of tessellations. They will write definitions and assess how well their group worked together. In addition, we have exposed the students to tessellations in the environment, such as interior design. If one can locate some prints by M.C. Escher, students will see how their topic can become a famous art form. As a culminating activity, students will create a classroom quilt. The quilt will be a combination of a geometric shape (the square piece of paper) and a geometric transformation (translation, rotation, or reflection).
This mathematical topic can also be explored in other subjects. Quilts and their importance can be studied through social studies. The classroom quilt can be considered symbolic for the class; each student could compose a story to explain her/his quilt patch. In science, when students are studying insects, they can connect tessellations to the wings of a fly or butterfly. These are some of the ways we think our topic of tessellations can be integrated across the curriculum.
CELs
Communication - students will communicate their understanding of the different tessellation concepts in written form. Since a number of lessons involve the teacher modelling a technique, students will have an opportunity to develop their listening skills. Because there is a lot of direct teaching involved, it will require the teacher to use clear and precise language. Students will also be encouraged to use "math language" - rotation, slide, trapezoid, hexagon, etc.
Numeracy - Students will engage in problem solving as they discover the different ways one can tessellate polygons from the geoblocks, and how to tessellate a shape using slide, rotation, and reflection techniques. During the introductory lessons, students will discover the characteristic traits of polygons and why certain shapes in and of themselves will not tessellate. Students will also predict certain outcomes regarding whether or not a shape will tessellate.
Personal Social Values and Skills - Students will work cooperatively and contribute positively in the group learning activities.
Independent learning - Students will be discovering tessellation patterns, which will lead to independent exploration.
Grouping
Because our classroom is already arranged into groups of four at tables, we decided to use this set up for our cooperative learning lesson. Most of the lessons in this unit involve individual work, although pairing and grouping could be used as an adaptation to students' needs.
Materials
Materials used in this unit are mainly geoblocks, paper, scissors, pencil crayons, and tape. The geoblocks are normally stored in containers in or on cupboards in the classroom. Recycled paper is recommended, when appropriate, so this paper would come out of the classroom recycling bin. Students should have their own pencil crayons and scissors. The teacher will need to provide tape.
Evaluation
Portfolios will be used to organize student work. Checklists and rating scales with set criteria will be used to check the students' understanding of tessellations and the procedure of tessellating. While students are working, anecdotal notes will be taken regarding the progress of each student and their involvement in each activity.
The teacher reflections should be taken throughout the unit, noting areas that need more work and if unit objectives were met. Reflection can also generate new ideas, and help the teacher to decide on necessary changes or adaptations that may be needed.
Students will have an opportunity to evaluate their own progress and
understanding of the unit content. Students will be provided with a rating
scale and checklist and asked to give themselves a mark for how well they understood the
concepts related to tessellations.
When working in groups, students will have the opportunity to evaluate
themselves as a group using rating scales and check lists.
LESSON 1
Subject: Math
Topic: Tessellations
Grade: 5
Set / Development: In a class discussion, the students will be asked what they notice about the shapes, particularly commonalities and differences. The students will be told that these shapes are called polygons (definition - a closed plane figure bounded by straight lines).
At this time the students will be introduced to the concept of tiling.
Polygons can be used to tile a surface. When tiling there can be no gaps or
overlaps. To demonstrate what tiling is, the square blocks from the geoblocks
will be used on the overhead projector.
Then the students will be asked to predict which shapes will tile
and which
will not.
Shapes |
|
| kite | oval |
| parallelogram / rhombus | triangle |
| pentagon | hexagon |
| circle | rectangle |
| semicircle | |
The students will be reminded to look at the square for the example.
- We will discuss/review the concept of predicting (a prediction does not have to be correct, it is just a guess)
An example / non-example chart will be used. Each shape will be voted on by the students as to whether it is an example or nonexample of tiling. Each table will use a set of shapes to see if they will tile a plane. Students will work individually for this activity. After the students have had time to decide whether the shape can tile we will regroup, revisit, and revise the example/nonexample chart based on the information the students found.
Closure: Students will write a definition of polygon and what they learned about them in their journals.
Extension: To prepare the students for the next class activity, we will discuss cooperative learning. Some goals for the groups may include letting everyone speak, taking turns talking, and to speak kind and encouraging words rather than put downs.
LESSON 2
Subject: Math
Topic: Tessellations
Grade: 5
Set: For the first 5 minutes we will review what we learned in the previous class. We will discuss the definition of a polygon at which time the students will have the opportunity to revise or make additions to the definition they wrote in their journals. We will review what it means to work cooperatively (working together, taking turns, being polite, etc.).
Development: Introduce the term tessellation and relate to what we were doing yesterday.
Activity 1:
- Each table receives one set of shapes and a piece of chart paper.
- Each student will use a different colour pencil crayon and working together they will tessellate the polygon on the chart paper.
- The students will write their names on the paper in the colour they
used or create a key.
TABLE 1 Triangle TABLE 2 Hexagon TABLE 3 Rectangle TABLE 4 Kite TABLE 5 Rhombus/parallelogram TABLE 6 Trapezoid TABLE 7 Hexagon
- As they finish tessellating, the group raises their hands to indicate they are finished. One of us will be available to check on the group, answer questions etc.
Activity 2
- Each table will receive 2 or more shapes.
- Using the same process as above (tracing with different coloured pencil crayons) the students will tessellate the other side of the chart paper.
| TABLE 1 | Triangle, Hexagon |
|---|---|
| TABLE 2 | Hexagon, Square, Triangle |
| TABLE 3 | Octagon, Square |
| TABLE 4 | Dodecagon, Triangle |
| TABLE 5 | Dodecagon, Square, Hexagon |
| TABLE 6 | Square, Triangle |
| TABLE 7 | Trapezoid, Triangle, Kite |
Closure: Students will regroup and share with the class what they
designed.
Students will report in their journals about how well their group worked together.
LESSON 3
Objective: to recognize tessellations in the environmentSet:
- Return math journals to the students for an opportunity to add and/or revise their definition of tessellating (tiling). Discuss as a class.
Development:
- Explain that there are tessellations everywhere in the environment.
- Discuss environment (any place outside one's personal space, like the classroom, for example).
- Sitting in their desks, students will look around the classroom in search of tessellations. Ask each student for an example.
Activity:
The class will be divided in half. One half of the class will go on a walking tour of the school in search of tessellations. The other half of the students will look through provided books in search of tessellations in the environment. After 15-20 minutes the groups will switch.Closure: Ask the students to share any tessellations they really liked. Ask them to write five examples they observed, either in the books or around the school, in their journal.
Self Evaluation from experience in the field:
- needed more examples before asking for examples from students.
- divide "problem people" up right away. Make them sit out if the misbehave.
- concept chart for tessellation/non-tessellation.
LESSON 4
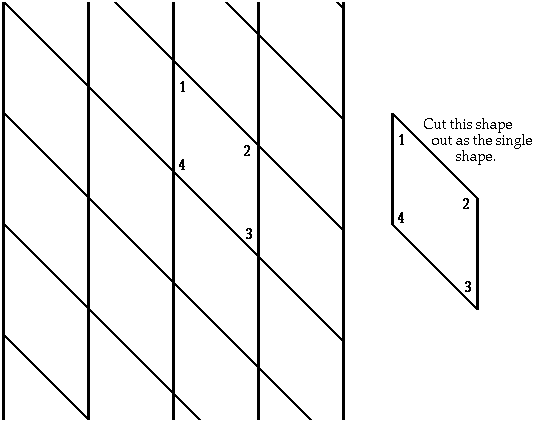
Objective: Develop visual and conceptual understanding of translation slides.Set:
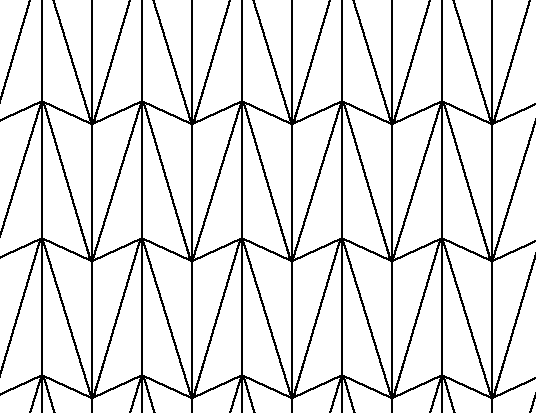
- Give each student a piece of paper that has been tessellated using a slide. One of the shapes will have the corners numbered 1 to 4.
- Give each student a single copy of the tessellated shape so that they may manipulate it. It will also have the corners numbered the same way as the sheet.
- Explain that there are two different ways to tessellate:
- the way we have been doing it, using polygons.
- and the way we will study for the next while - transforming the polygon.
Development:
- Using the overhead, demonstrate the activity using a different tessellated pattern.
- Place a single shape over the tessellated shape that has the corresponding numbers on it.
- Slide the shape to the one beside the original and write the numbers in the correct corners. Continue for two more shapes.
- Ask the students what they have observed. Ask them to describe the demonstrated procedure:
- line up the edges,
- lift the shape, and
- write down the corresponding numbers.
- Students will predict what will happen when they try it.
- Now the students will repeat the procedure with their sheet of paper (10 minutes).
- Were the predictions confirmed? Do they see any patterns on their papers?
Explain that this way of tessellating is called the slide translation. Why do they think this is so? Discuss in small groups and then tell students to decide on a definition and write it in their journals.
Extension: Flip paper over and begin to tessellate it using the same procedure.
Evaluation: Students will hand in their sheets and their journals. A check list will be used to note if they understood and performed correctly the procedure and if they wrote a definition for slide translation. The definition does not have to be correct in order to receive credit.
Definition:
SLIDE TRANSLATION: Tessellating a shape across a surface, without flipping it or changing the position of the corners.
LESSON 5
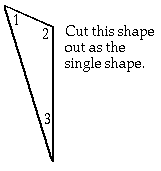
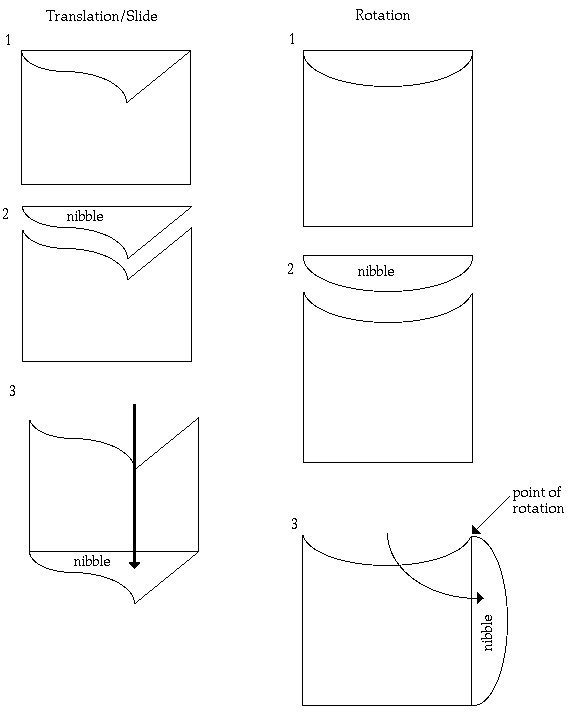
Objective: Creating shapes that tessellate and developing the nibbling technique for geometric transformations.
Set:
- Students will receive a blank sheet of paper and the same shape from Activity 4. They will be encouraged to tessellate using the slide (5 minutes).
- Review and revise their definitions for slide translation.
Development:
- Tell students that we will be exploring a way to make our own shapes tessellate. We will use the nibble technique to change an ordinary square into a different shape.
- Hand out 3 x 3 recipe cards, one for each student. Tell them to lightly colour one side of the card (preferably the one with lines on it).
Using a series of overheads, demonstrate the nibbling technique.
- Draw a simple design from one corner of the sheet to an adjacent corner.
(Do not draw diagonally) Stress to the students that they must draw from corner to corner. Do not
stop halfway across!
- Cut on the design line, being sure to have 2 pieces when done -the nibble
and the rest of the sheet. There should be no other pieces laying around.
This is very important! No trimming allowed.
- Slide the nibble across the sheet to the opposite side and tape the
straight edges together. Do not attach it to an adjacent edge. Do not flip
the nibble around so that the coloured side is showing. Do not overlap the
edges when taping. The corners of the piece and the nibble should match
perfectly.
- Repeat the procedure for the other sides, but ask the students to tell you how to do it.
- Encourage students to make their own slide tiles using the nibbling technique. For those needing more guidance, have them come to the front of the room with their cards and go over the procedure with them individually. Use an oversized version of their card to demonstrate, if needed.
- Encourage them to use simple designs for their first attempt at the nibbling technique. This will hopefully lead to success at all levels.
- Students will use their slides to tessellate an 8 1/2 x 11 sheet of paper. If time allows, they may colour their pattern.
Evaluation: Paperclip the slide and 8 1/2 x 11 sheet together and collect them. Assess the quality of the nibble and the tessellated paper.
LESSON 6
Objectives: To expose students to another form of tessellations which is the result of rotating the polygon. To help students understand that the reason some shapes tile is because the sum of the angles around any point will equal 360o. If it does not, the shapes will not tessellate.Set:
- Students will be divided into six groups to tessellate a polygon at each of the stations. They will be asked to think about what they had to do to the polygon in order to get it to tessellate. (i.e. how did they manipulate it).
- Then they will be instructed to number each of the corners and trace a series of polygons using rotation and record the number in the corners.
- Students will be asked to explain what they observed and if they saw any patterns within the numbers.
Development:
- It is intended that this unit would follow after a unit of measurement - angles. Tthe student would have a general idea of what angles are. The student will be given the degrees for each angle of their polygon.
- Ask the students to trace their polygon. Have the students add the sum of each of the polygons. They will be asked to write the degree of the angles in the corresponding corners and then rotate their polygon and add up the angles around the vertex.
- Learning Environment
- The class will be set up with six stations with the following polygons (pattern blocks) at each station - square, triangle, rhombus (beige), rhombus (blue), trapezoid, and hexagon. For the set, the student will be asked to rotate from station to station and do the same activity.
- Evaluate
- Students will be asked to write a definition of rotation in their
math journal. These will be checked for accuracy. Since students will be
asked to trace their polygon using rotation this will also be used to determine
if the student understands rotation.
- Rotation is restricted to polygons with adjacent sides that are congruent.
LESSON 7
Objectives - This is an extension of rotating using the nibbling technique. Students will realize that they can alter a polygon's shape and still have it tessellate.Set
- We will review the term rotation. Students will be shown examples of tessellations with rotation and the use of the nibbling technique.
- They will be asked to think about and identify what was done in order for the shape to tessellate. As a class we will discuss our ideas.
Development
- Students will be reminded of the important guidelines that must be followed when using the nibbling technique.
- To make this as simple as possible all students will be given a square to work with.
- They will colour one side so they will not confuse the front and back.
- The teacher will first demonstrate the rotating and nibbling technique on a large sheet of paper so that all of the students can see how it is done. This example will be left on the board for reference.
- The teacher will also mark on the example where the point of rotation is.
- Using the nibbling technique, students will be asked to cut out a nibble from corner to corner of their square. Instead of sliding the nibble, the student will rotate the nibble at its end point to an adjacent side of their square (not an opposite side).
- Students will then tape the piece making sure that it matches a
straight edge.
Key point to remind students:
- make sure sides altered are different to avoid confusion when tessellating.
- cut exactly from corner to corner.
- when taping nibble to straight edge make sure everything lines up - corners and edges.
- Once the students have completed their "starting shape" they will rotate or turn the shape, tracing it on a piece of paper to create a tessellation.
LESSON 8
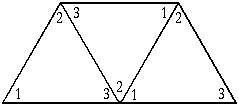
Objectives: To recognize the third type of tessellation (reflection), describe it, and make a definition for it.
Set:
- Explain to students that they will be getting a sheet of paper with tessellated triangles.
- Explain that only one triangle's points are numbered.
Hold up a large example of a reflection tessellation with only one shapes' points numbered. - Show students that they are going to have to number each point of every triangle so that the numbers correspond to the points on the original triangle.
- Explain that once the points have been numbered, the students are to decide whether the triangle has been" flipped" from its original position. If it has been "flipped," they are to colour the triangle. If it has not, they must leave it white.
- They must do this for every triangle (i.e. number points, and colour if triangle "flipped").
- Explain that each student will receive a tessellated sheet, but they may work in pairs.
- Ask students to review the steps.
Development:
- Hand out the tessellated sheets to each student. Explain that when they have finished numbering the points and colouring the "flipped" triangles on the entire sheet, students must write down what they noticed, and describe how they numbered and coloured the triangles, in their journals.
- Ask the students to use correct terminology (slide, rotation, etc.). Allow students 10 - 20 minutes to work on the tessellations and 5 - 10 minutes to reflect.
- When students are finished, have each pair present their tessellations to the class, describing what they did (did they rotate and flip? or slide and flip?).
- When each student has finished presenting, ask students to describe their type of tessellation.
- Ask what happened to the original triangle. Probe if needed.
- Write their answers on the board. Give them the definition of a reflection tessellation. Write it on the board.
- Compare the two definitions. Ask students if they were close to the actual definition.
- Have students write the definition in their journals. Have students hand in their sheets and journals.
Evaluation:
- Checklist to note if students understood and performed procedure correctly.
- Check to see if a definition for reflection tessellation has been written.
Definition of Reflection: tessellating a shape with a combination of gliding, rotating and flipping.
 |
 |
LESSON 9
Objective:
- recall the definition of a reflection tessellation and
- Use the nibble technique to make reflection tessellations
Set:
- Review nibble technique. Remind students that only two pieces must be cut. Explain to students that they will be making reflection tessellations.
- Show students on a large piece of paper how to draw a design, point to point, cut it out, then slide one piece to the opposite side and flip it over. Tape it into position.
- Do this on two sides. Show how it tessellates (trace it a few times, sliding and flipping, rotating and flipping).
- Review the steps for nibbling a reflection tessellation. Ask if there are any questions.
- Hand out a piece of white paper, and a square card to each student. Explain to students that when they are done they are to write the steps they used for tessellating in their journals.
- When they have finished tessellating and writing in their journals they can colour their tessellations.
- Allow 20 minutes for students to make their shapes and to tessellate them.
- Have each student present their tessellations. Have other students observe each other and ask the students observing to tell whether it fits the criteria of reflection tessellation (has it been flipped, slid, or rotated?).
- Ask students to think about and name the three kinds of tessellations they use. Ask students to think about what kind of tessellation they like the best and what kind of design they would like to do for a quilt.
Evaluation: Have students hand in their tessellation paper and their shapes. Have a checklist with criteria: creativity, precision of tessellation, and understanding.
LESSON 10
Set:
- Ask students to think about and name the three kinds of tessellations they used.
- Ask students to think about what kind of tessellation they like the best and what kind of design they would like to do for a quilt.
Development: Using a quilt as an example, discuss how the class can make a quilt using the three types of transformations.
- they may choose to use one of their cards from the other lessons, or they may make a new one.
- Give them an 8 1/2 x 8 1/2 piece of paper or a 3 x 3 recipe card.
- Encourage them to challenge themselves with a harder transformation.
Evaluation: Assess the quality of the "quilt block":
- Do the shapes tessellate well?
- Did the student take the time to do a good job?
- Is it neat? Colourful?
- Is the shape creative?
Internet Sites
- Tesselation Resources
- provides references about tessellations and sources for illustrations (approx. 45 resources)
-
What is a Tesselation - answers what is a tessellation
- opportunity to ask Dr.Math about tessellations
-
Student Tesselations - this site provides designs that students have created
-
Investigation Tesselations - investigating tessellations using pattern blocks
- links to activities using pattern blocks in colour
-
Tesselation Links - tessellation links 15-20 sites
Resources
Bolster, Carey.  Activities: Tessellations.  Mathematics Teacher 66(April 1973): 339-342.

Clauss, Judith.  Pentagonal Tessellations.  Arithmetic Teacher 38(January 1991): 52-56.

Giganti, Paul and Mary Jo Cittadino.  The Art of Tessellation.  Arithmetic Teacher 38 (March 1990): 6-16.

Kaiser, Barbara.  Explorations with Tessellating Polygons. Arithmetic Teacher 36 (December 1988): 19-24.

Maletsky, Evan.  Designs with Tessellations.  Mathematic Teacher 67 (April 1974): 335-338.

Van De Walle, Jon.  Let_ Do It: Concepts, Art and Fun From Simple Tiling Patterns. Arithmetic Teacher 28
         (November 1980):4-8.
Tessellations Within Nature
Hiebert, C.E. (1995). Gift of Wings. Erin, Ontario: The Boston M
Mills Press.
Muir, R. (1986). Landscape and Nature Photography. London: George Philip.
Nuridsany, C. and Perennou, M. (1976). Photographing Nature. New York: Oxford University Press Inc.
Wignall, J. (1987). Landscape Photography - A Kodak Guide. Rochester, NY: Photographic Products Group.
Tessellations Within Craft
Better Homes and Gardens (1990). Christmas Quilts and Afghans. USA: Meredith Corporation.
Duff-Williamson, D. (1992). Sensational Scrap Quilts. Paducah, KY: American Quilter's Society.
Perry, G. (1995). Impressionist Quilts. Lafayette, California: C & T Publishing.
Tessellations Within Interior Design
Diamonstein, B. (1982). Interior Design - The New Freedom. USA: Rizzoli International Publications, Inc.
Marberry, S.O. and Zabon, L. (1995). The Power of Color. Toronto: John Wiley & Sons, Inc.
Pile, J.F. (1988). Interior Design. New York: Harry N. Abrams, Inc.
Brochures
Artistic Landscaping Supplies (1996) Ltd. 5901 13th Avenue, Regina.
Evaluation / Assessment Tool
Seymour, D. (1982). Tessellation Teaching Masters. Canada: Dale Seymour Publications.
To return to the previous page use your browser's back button.