Hands-On Geometry:
Using Manipulatives in Math 10
Lines and Line Segments
Angles and Polygons
by
Kathleen Bracken
1994
CELs
S105.14
Table Of Contents
Section 1:
Mira Constructions: Lines and Line Segments
Section 2:
Pythagorean Puzzles
Section 3:
Build a Clinometer
Section 4:
Geometry Flash Cards
Section 1: Mira Constructions:
Lines and Line Segments
Foundational Objectives:

To develop an informal understanding of the relationships between lines. (10 04 01)
Specific Objective:
Students will use a Mira to construct:
D.4, D.5, D.6, D.7 (Page 138, Math 10 Curriculum Guide)
|
a) | congruent segments
|
|
b) | the perpendicular bisector of a line segment
|
|
c) | a line perpendicular to a given line from a point not on the line
|
|
d) | a line perpendicular to a given line from a point on the line
|
|
e) | a line parallel to a given line through a given point not on the line
|
|
f) | quadrilaterals: parallelogram, rectangle, square, rhombus
|
Enrichment: (but highly recommended as a concluding exericse)
|
g) | circumscribe a circle about a triangle
|
|
h) | bisect an angle
|
|
i) | inscribe a circle in a triangle
|
Time:
3 hours of work, 1/2 hour assessment
Instructional Strategies:
Independent Learning, Interactive Instruction, Instructional Methods and Activities:
|
1. | Learning Activity Package:
Students may use the following activity sheets (included in the PDF version of this resource) to informally construct the required segments and lines. The final three (optional) activities require the students to use the basic constructions to construct special circles.
|
|
2. | Peer Practice:
Students work in groups of 2. Each pair of students requires a Mira and a compass. Partnerships made up of one strong and one weak student are very effective here.
|
| * | If students have not previously used the Mira, it is suggested they be given an introductory lesson on its use. (Recommended: pages 3-6 in Geometric Constructions and Investigations with a Mira).
|
Equipment:
|
Mira
|
|
sharp pencil or mechanical pencil
|
|
duplicated copies of activity package
|
References:
Geometric Constructions and Investigations with a Mira, Ernest Woodward and Thomas Hamel, J. Weston Walch, Publisher, Portland, Maine, 1992.
Assessment Technique:
1. Formative: examination of learning activity booklet throughout the 3 days of work.
2. Summative: Contract and Peer Evaluation (see template)
|
a) | Each student selects and records the names of 6 constructions he/she would like to be evaluated on. (Suggestion: 4 basic ones and 2 more complex ones).
|
|
b) | One student acts as the examiner, one as the test taker. (If the stronger student starts as the test taker, then the exercise can be a learning exercise for the weaker student as well).
|
|
c) | The test taker is given fifteen minutes to complete his/her chosen constructions. The examiner initials each item and records a mark of 5 for each completed construction. Then the examiner assigns a mark out of ten for the other criteria. A mark out of sixty is then assigned.
|
|
d) | Roles are reversed for the remaining fifteen minutes.
|
Adaptive Dimension:
Students may complete this exercise individually as materials allow. This allows for teacher and small group sessions where more direct teaching is required.
Class - Management Tip:
This package works well with the teacher working on the overhead and a more teacher-guided approach to introduce each construction.
List of Constructions:
Only Activity 1 - Sheet 1 and Activity 7 - Sheet 12 are included here. All of the activities are included in the PDF version of this resource.
| Activity 1: | Construct Congruent Segments - Sheet 1 |
| Activity 2: | Construct the Perpendicular Bisector of a Line Segment - Sheets, 2, 3, and 4 |
| Activity 3: | Construct a Line Perpendicular to a given line from a point not on the line - Sheet 5 |
| Activity 4: | Construct a line perpendicular to a given line from a point on the line - Sheet 6 |
| Activity 5: | Construct a line parallel to a given line through a given point. Sheet 7 and 8 |
| Activity 6: | Construct Quadrilaterals - Sheets 9, 10, and 11 |
| Activity 7: | Circumscribe a Circle about a Triangle - Sheets 12, 13, 14, and 15 |
| Activity 8: |
a)Bisect Angles - Sheets 16 and 17
b)Inscribe a Circle in a Triangle - Sheets 18, 19, and 20 |
Evaluation Template: Sheet 21
Activity 1: Construct Congruent Segments - Sheet 1
Instructions: Place the Mira on the mirror line m and draw a congruent figure to the one you see on the sheet.
a)
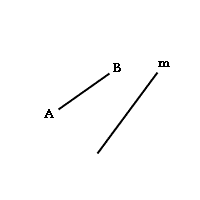
b)
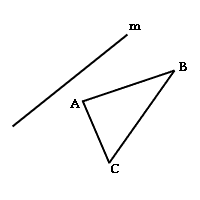
c)

Activity 7: Circumscribe a Circle about a Triangle - Sheet 12
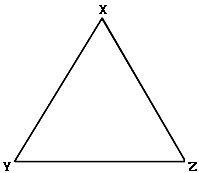
Instructions:
|
1. | Construct the perpendicular bisector of side YZ.
|
|
2. | Construct the perpendicular bisector of side XZ.
|
|
3. | Construct the perpendicular bisector of side XY.
|
|
4. | Label as P the point where the perpendicular bisectors intersect.
|
|
5. | Draw the circle with center P which passes through X.
|
|
6. | Does the circle pass through Y and Z? _ _ _ _ _
|
|
7. | If the circle passes through all three points X, Y, and Z, it is the circumscribed circle of triangle XYZ.
|
Return to the table of contents.
Section 2: Pythagorean Puzzles
Foundational Objective:
To develop an understanding of Pythagoras' Theorem. (10 05 03)
Specific Objectives:
Students will assemble puzzles that demonstrate the Pythagorean Theorem.
Time:
1 Hour
Instructional Strategies:
Interactive Instruction
Instructional Methods and Activities:
a) Laboratory Groups
b) Problem Solving
|
1. | These puzzles could be used over a few days as supplemental activities or they could be an integral part of the content development. For students and teachers who are familiar with the Pythagorean Theorem, the following activities are designed so that they can review and extend the mathematical processes already learned.
|
|
2. | Students may work individually, in pairs or in small groups. Group work tends to stimulate communication and problem-solving skills and therefore these activities serve as excellent co-operative group activities. Encourage students to take them home and complete them with them with their families.
|
|
3. | Distribute one puzzle at a time. It is recommended that each student have a copy even if working in a group. Each puzzle should be completed and the results shared and discussed in a whole-class setting before continuing on to the next.
|
Equipment:
scissors
duplicated copies of puzzles
optional: overhead transparencies of puzzles
Resources:
"Pythagorean Puzzles" by Raymond E. Spaulding in Activities from the Mathematics Teacher, edited by E. M. Maletsky and C. R. Hirch, NCTM, February, 1974.
"Pythagorean Disection Puzzles" by William A. Milner and Linda Wagner in Mathematics Teacher, April, 1993, pages 302-314.
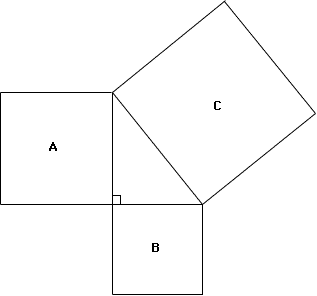
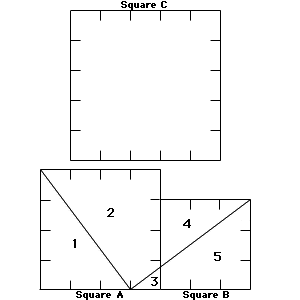
The PDF version of this resource contains a collection of Pythagorean puzzles, some from the references listed above,as well as enrichment and extension puzzles (Perigal's Pythagorean Puzzle and Loomis's Pythagorean Puzzle).
Only one puzzle is included here.
A Pythagorean Puzzle
Instructions:
Assessment Technique:
€ informal questioning
€ written assignment: Paragraph summing up the relationships demonstrated in the puzzles
€ suggested * Group evaluation form (see template)
Adaptive Dimension:
Students could try the same puzzles again using other right triangles of their own choice along with the corresponding squares. Students who are interested in these activities can experiment with other dissections of square regions A and B to cover square C. For excellent extension activities, see Mathematics Teacher, April 1993, pages 305-5. (See resources).
Classroom Management Tip:
There is a tremendous difference in how fast groups will solve these. Have the early ones cover up their solutions and go on with other work (homework) to enable everyone to try.
Return to the table of contents.
Section 3: Build a Clinometer
Foundational Objectives:
To develop an understanding of the primary trigonometric ratios and their applications (10 05 03).
Specific Objectives:
Apply the trigonometric ratios to problems involving right triangles.
*Students will construct an angle-measuring device called a clinometer, and will use it to measure the Angle of Elevation of several inaccessible objects outside of the school. They will then use trig ratios to determine the heights of these objects.
Background:
Knowledge of right triangles and the three primary trigonometic ratios. (This activity only uses Tangent).
Time:
This activity takes 1 hour to set up and explain; 1/2 hour to complete measurements and 1/2 hour to do the calculations and analysis.
Classroom Management Tips:
Because of the freedom allowed to the students in this activity, it is very important that students are absolutely clear as to what is expected of them. Clearly explain where they can go, what they do, and when to be back.
Instructional Strategies:
|
A. | Direct Instruction
|
|
B. | Interactive Instruction
|
|
C. | Experiential Learning
|
Instructional Methods and Activities:
|
A. | 1. | Structured Overview
Student should practise "Angle of Elevation" problems. Begin with a discussion of how the students could use trigonometry to determine the measure of an inaccessible object. (See "Angle of Evaluation" Problems).
|
|
A. | 2. | Demonstrate use and construction of Clinometer (See instructions and pattern)
|
|
B. | 1. | In groups of 2 or 4, have students assemble Clinometer and prepare data-collection sheet. (See "Jobs to be Done" and "Data Collection Sheet").
|
|
B. | 2. | Clearly outline to students before they leave the classroom:
a) how many items they are to measure (recommendation: 5).
b) how results are to be recorded; what is to be handed in; when work is due.
|
|
C. | 1. | Field Trip:
Outline areas students may go. Suggestions: outside, anywhere on school grounds, within 1 block of school, etc. [in bad weather: gym, cafeteria, hallways, just outside the door]. BE VERY SPECIFIC!
|
|
C. | 2. | Outline time allowed. (Suggestion: 1/2 hour and they must be in their seats or take a zero on the project.) BE VERY SPECIFIC!
|
|
C. | 3. | After collecting the data, students will need about 20 minutes to complete diagrams, calculations and summary statements. *Be clear whether group or individual results are to be turned in.
|
Equipment:
(A) Clinometer:
- piece of cardboard or stiff paper, approximately 25 cm x 30 cm.
- photocopy of enlarged protractor 0 - 90°
- straw
- tape
- scissors
- thread
- button
(B) Measurement Device for baseline:
- Trundle Wheel or
- Meter sticks or tape or
- Students can pace off the distance and measure a "typical pacing step" after returning to the classroom.
(C) Data Sheet: can be hand-drawn by student or photocopied.
(D) Calculator
Instructions for Clinometer:
|
1. | Cut out the photocopy of the protractor carefully along to 0° and the 90° lines.
|
|
2. | Glue the protractor into the upper right corner of the cardboard so that the edges match.

|
|
3. | Attach the string as close as possible to the upper right corner of the cardboard and attach the button so that it swings freely below the numbers.
|
|
4. | Tape a 5 - 10 cm piece of straw in the upper left corner so that it sights along the 90° line.
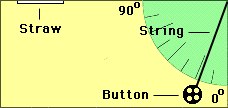
|
|
5. | To use clinometer: Look through the straw at the object. Have partner read the angle of elevation shown by the string.

|
Instructions for Groups:
See Clinometer: Jobs to be Done
Note: These four jobs can be done by four people or by two people.
Data Chart:
Students can design their own, or this can be developed together on the board and copied by students or it can be photocopied.
ANGLE OF ELEVATION PROBLEMS
|
1. | To measure the height of an inaccessible TV tower, a surveyor paces out a base line of 200m and measures the angle of elevation to the top of the tower to be 62° . How high is the tower?
|
|
2. | A tourist stands 15m back from the base of a statue and looks up to the top of the statue. If the angle of evaluation is 48°, find the height of the statue.
|
|
3. | A student paces a base line 12m from the bottom of flagpole. She then uses a clinometer to measure a 35° Angle of Elevation. How high is the flagpole? (The distance from the ground to the student's eyes is 150 cm).
|
CLINOMETER: JOBS TO BE DONE
|
1. | PACER: for each object to be measured, this person must pace off the distance from the object to the SIGHTER. This must be done in a straight line. The PACER must then tell the RECORDER how many paces it took.
|
|
2. | SIGHTER: this person is in charge of the Clinometer. For each measurement, the SIGHTER sights the top of the object and remains still while the ANGLE READER has read the angle. He/she should also remain still until the PACER has measured the base line.
|
|
3. | ANGLE READER: when the SIGHTER has sighted the top of the object, this person reads the size of the ANGLE OF ELEVATION shown on the Clinometer and approximates it to the nearest degree. The ANGLE READER then tells the RECORDER the value of the angle.
|
|
4. | RECORDER: this person will record on the chart the ANGLE OF ELEVATION, the number of paces in the base line and the distance from the sighter's eyes to the ground.
|
PROCEDURES
|
1. | The RECORDER should be the one to take the instructions and chart outside.
|
|
2. | The SIGHTER should have the Clinometer.
|
|
3. | When the measurements are finished, return to the classroom and copy the information collected by the RECORDER.
|
|
4. | Draw the diagrams and calculate the rest of the information needed in the table.
|
Assessment Techniques:
|
€ | Written Assignments: either individual or group results could be collected. Suggestion: collect completed data charts, diagram for each situation and computed results.
|
|
€ | Quiz or test could be given.
|
|
€ | A portion of the evaluation could be from a Group Self- Evaluation form (see template).
|
Adaptive Dimension:
|
1. | This exercise can be done as a scavenger hunt. Each group can be provided with a different set (or different order) of objects.
|
|
2. | This exercise could also be done as a race with a list of objects and a time limit.
|
Return to the table of contents.
Section 4: Geometry Flash Cards
Foundational Objective:
To identify and apply common properties of triangles, special quadrilaterals, and n-gons. (10 05 01)
Specific Objectives:
(Math Grade 10 Curriculum Guide)
|
D.1 | define and illustrate line segment, ray, line, bisector, median, perpendicular line, perpendicular bisector. (Page 138)
|
|
E.1 | define and illustrate acute angle, right angle, obtuse angle, straight angle, reflex angle, complementary angles, supplementary angles, adjacent angles, vertically opposite angles, congruent angles, central angles of a polygon. (Page 140)
|
|
E.3 |
| a) | define and illustrate polygons: convex, regular, triangle, quadrilateral, parallelogram, rectangle, rhombus, square, trapezoid, and isosceles trapezoid.
|
| b) | define and illustrate triangles: scalene, isosceles, equilateral, acute, right and obtuse. The student will produce a deck of cards with the name of the object on one side and definition of the object on the reverse. Then students will use these to identify and relate common properties.
|
|
Time:
|
(1) | Flash card review - 10 to 15 min. periods.
|
|
(2) | Concept map - 30 min.
|
Instructional Strategy:
|
A. | Interactive Instruction
|
|
B. | Indirect Instruction
|
Instructional Methods:
A. Peer Practice:
|
1. | Students work in groups of 4. Have each group prepare a full set of cards with Name on one side and definition on the other. Activity sheet #1 can be enlarged, glued to stiff paper, and cut out.
[Sets of blank cards are commercially available.]
|
|
2. | Students work for 10-15 min. periods with a partner. (Suggestion - the original group of 4 divides the deck in half, practises in groups of 2's with half the deck, then switches halves.) This can be done for practice at various times during the unit.
|
B. Games:
|
€ | show name, give definition
|
|
€ | show definition, give name
|
|
€ | keep if correct, leave in pile if incorrect.
|
|
€ | rough version of War can be played where the winner's term contains the loser's term.
Example: triangle beats line segment, polygon beats triangle.
|
| line | parallelogram | acute angle |
| complementary angle | rectangle | congruent angles |
| rhombus | straight angle | ray |
| obtuse angle | line segment | right angle |
| supplementary angle | square | vertically
opposite angle |
| trapezoid | point | adjacent angle |
| isosceles trapezoid | scalene triangle | quadrilateral |
| isosceles triangle | equilateral triangle | acute triangle |
| polygon | right triangle | obtuse triangle |
| convex polygon | triangle | regular polygon |
central angle
of a polygon | pentagon | hexagon |
Concept Mapping:
|
1. | This activity is suggested for use at the end of the unit. The purpose of it is to show a logical ordering of the relationships that students have been studying throughout the unit.
|
|
2. | Students work in groups of 4 with one deck of cards and a large surface between them (ex. 4 desks pushed together).
|
|
3. | Students form a "concept map" using the cards to demonstrate as many relationships as possible.
Example of starting point:
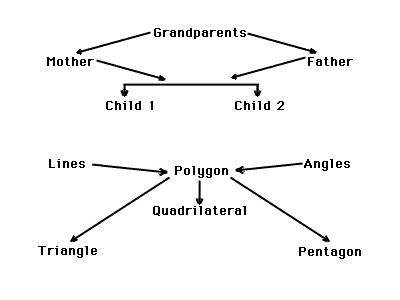
|
|
4. | A copy of the final map could be put onto an overhead transparency to facilitate class discussion.
|
Equipment:
|
€ | commercially prepared decks of cards that are blank OR
|
|
€ | photocopy and enlarge Activity Sheet , glue to stiff paper
|
|
€ | scissors
|
|
€ | rulers
|
Assessment Technique:
(a) Flashcards
- Used for review before Unit Exam
- Oral or Written Quiz following practice time
(b) Concept Map
- Class Presentation with an emphasis on explaining the relationships that are demonstrated (an overhead could be made of each concept map, used for the presentation, then handed in to be marked).
- group evaluation template included.
Adaptive Dimension:
When all groups have their final concept maps completed, each group could visit one or two other groups and compare final products. It is interesting for students to see how the same ideas can be organized in different ways.
Return to the table of contents.
This unit comes from the The Stewart Resources Centre which provides
library resources and teacher-prepared materials for teachers in Saskatchewan.
To borrow materials or obtain a free catalogue listing unit and lesson plans contact :
Stewart Resources Centre,
Sask. Teachers' Federation,
2317 Arlington Avenue,
Saskatoon, SK S7J 2H8;
phone 306-373-1660; fax 306-374-1122,
e-mail src@stf.sk.ca.
http://www.stf.sk.ca/
Go to Math Central
To return to the previous page use your browser's back button.